How to Quickly and Easily Create an A4 Photo Collage

An A4 collage is a great size for most places. You can hang it on a wall, use it at work, or give it as a gift. A4 paper fits almost any printer, so it's easy to print your collage at home.
In this guide, you'll find step-by-step instructions for creating a photo collage on an A4 sheet. You'll learn how to arrange one, two, three, four, or more photos on an A4 page and discover ideas for making different styles of A4 collages.
If you're looking to make a collage of any other size, here's a tutorial on how to do it.
What You Need to Get Started
- A few photos saved on your Mac or Windows PC. These are the images you will use to create the collage.
- TurboCollage software. If you haven't downloaded it yet, no worries! You can quickly grab it and install it from here.
- (Optional) An A4 sheet if you plan to print your collage.
- (Optional) A printer that can print an A4 size if you plan to print your collage. Good news: most printers print A4 size!
Before we learn to put multiple pictures on an A4 sheet, let us first learn to put a single image on an A4 sheet.
Make an A4 Photo

In this section, we will learn to resize any image to A4 size. Follow the instructions below to easily convert a JPG to A4 size.
Step 1: Set the Output Size to A4
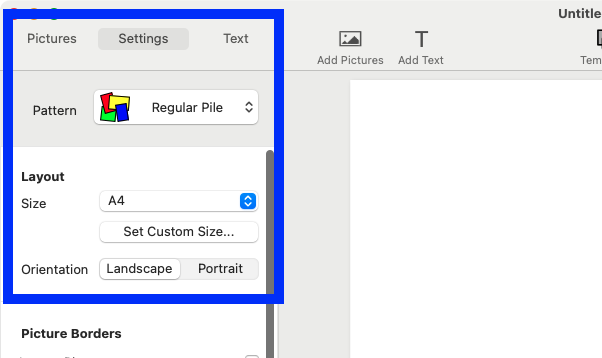
To set the output size, Open TurboCollage and navigate to the Layout section under the Settings tab. From the Size drop-down menu, select A4.
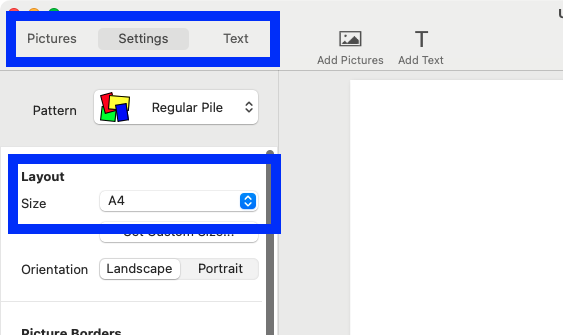
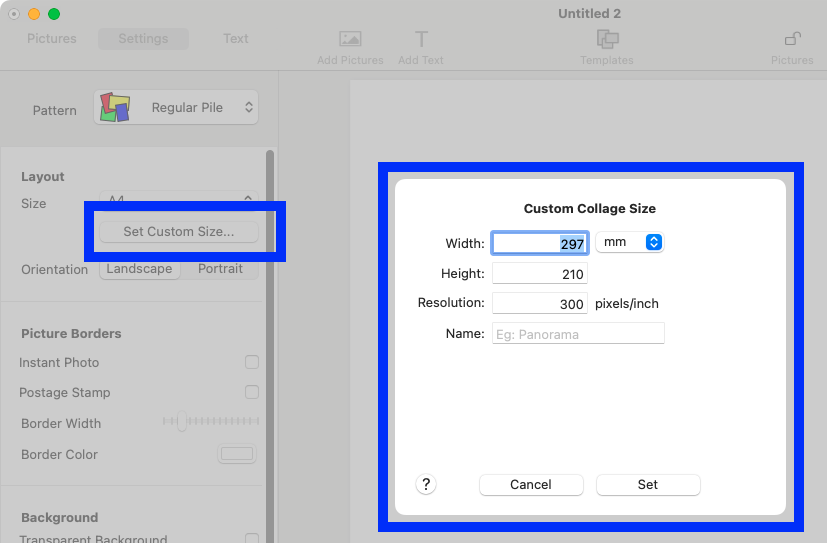
Alternatively, you can set the size by specifying its dimensions. To specify dimensions, click the Set Custom Size... button in the Layout section.
A4 size equals:
- 210 mm × 297 mm
- 21 cm × 29.7 cm
- 8.27 inches × 11.69 inches
If you set the resolution to 300 pixels per inch, the equivalent dimensions in pixels are 2480 px × 3508 px. This is calculated by multiplying the size in inches by the resolution (8.27 inches × 300 for width and 11.69 inches × 300 for height).
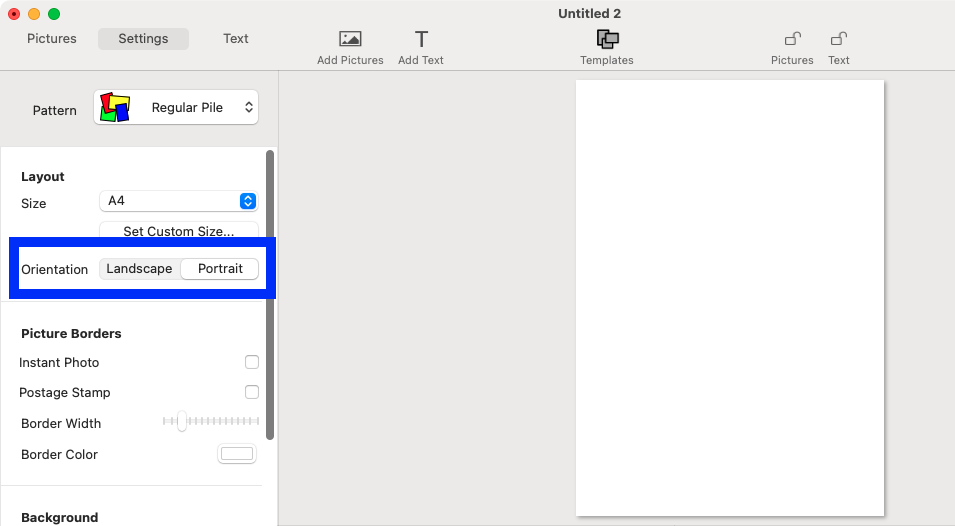
You can create your A4 image in either Landscape (297 mm wide by 210 mm high) or Portrait (210 mm wide by 297 mm high) orientation.
Step 2: Set up Layout
Select the Picture Grid collage pattern, and since we're adding just one picture, set the number of rows and columns to 1 each.
Here's how your TurboCollage should look if you're looking to make an A4 image in Landscape orientation:

Step 3: Add Image
Add your image; TurboCollage will instantly use it to fill the layout you set up earlier.

Step 4: Adjust Borders
By default, TurboCollage sets a border around the image. Adjust the border to suit your requirements. We've set the border to zero.

Step 5: Crop the Image
You can easily crop the image you've added as shown in the short video below.

Step 6: Export the image to an A4-size JPG
Once you're happy with the image layout, export it to an A4-size JPG.

Fit Four Photos in an A4 sheet
Let's now learn to put four photos on an A4 page. You can follow similar steps to arrange 2, 3, 4, 5, 6, or any number of photos on an A4 sheet. No matter how many photos you use, the first step is always to set the collage size to A4.

An A4 image made from four pictures. The size of this image has been reduced for fast downloading. Download original.
Step 1: Set the Collage Size to A4
To set the collage size, Open TurboCollage and navigate to the Layout section under the Settings tab. From the Size drop-down menu, select A4.
Alternatively, you can set the size by specifying its dimensions. To specify dimensions, click the Set Custom Size... button in the Layout section.
A4 size equals:
- 210 mm × 297 mm
- 21 cm × 29.7 cm
- 8.27 inches × 11.69 inches
If you set the resolution to 300 pixels per inch, the equivalent dimensions in pixels are 2480 px × 3508 px. This is calculated by multiplying the size in inches by the resolution (8.27 inches × 300 for width and 11.69 inches × 300 for height).
You can create your collage in either Landscape (297 mm wide by 210 mm high) or Portrait (210 mm wide by 297 mm high) orientation.
Step 2: Set up Collage Layout
Select the Picture Grid collage pattern, and since we're adding four pictures, set the number of rows and columns to 2 each.
Here's how your TurboCollage should look if you're using A4 in Landscape orientation:

Here's how your TurboCollage should look if you're using A4 in Portrait orientation:

Step 3: Add Pictures
Add your four pictures to the layout. TurboCollage will instantly use them to fill the layout you set up earlier.

Step 4: Customise the Look and Feel
Now you can customise various settings to change your collage's look as per your liking. Learn to customise picture grids in our detailed tutorial.
Here's what our customised A4 collage with 4 photos looks like:

Step 5: Export the Layout to a JPG
Once you've composed the A4 collage from your four pictures, you can export it as a JPG.

Step 6: (Optional) Print JPG on an A4 Sheet
You can easily print the exported JPG to an A4 sheet, email it, or share it on social media.
Make an A4 Picture Grid
In the previous section, you saw how to put 4 images on an A4 sheet. In this section, we will show you how to put any number of images in an A4 photo grid.
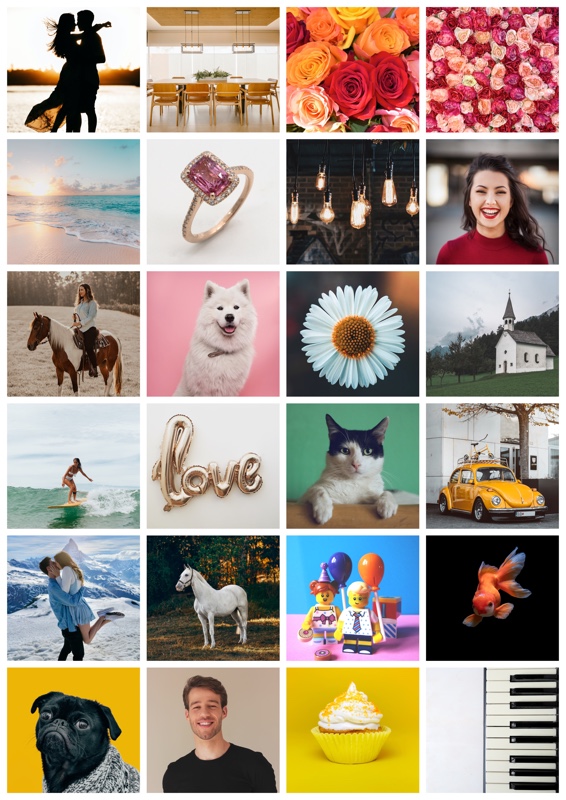
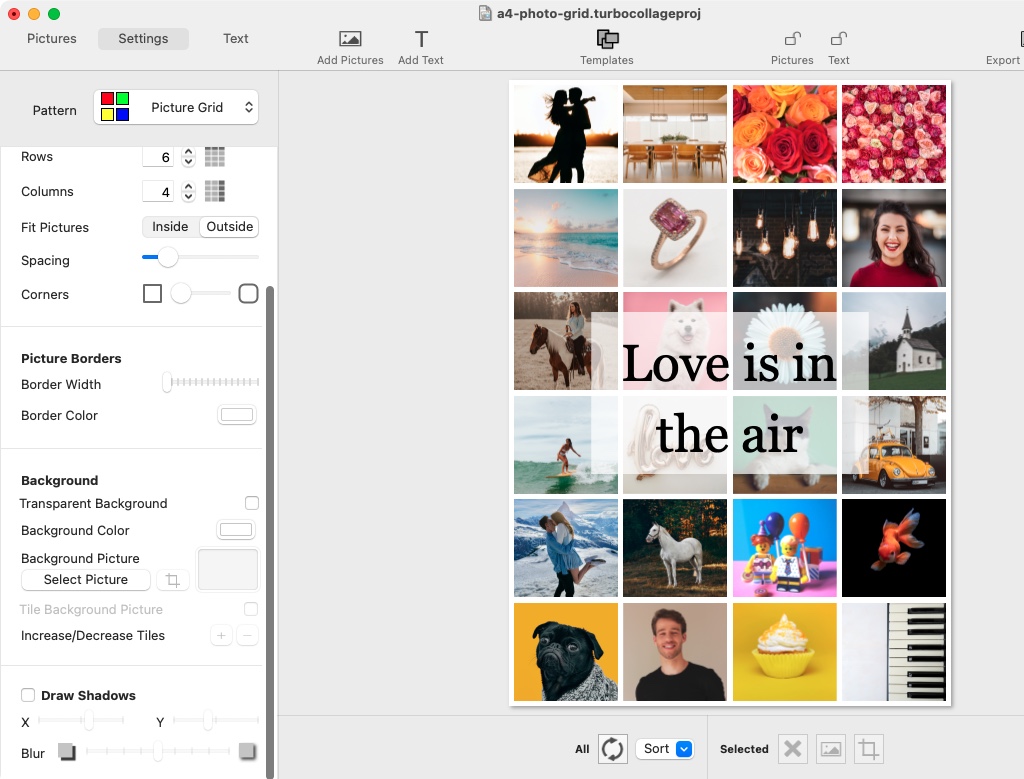
An A4 paper size photo grid in portrait orientation. The size of this image has been reduced for fast downloading. Download original.
Follow these steps to make an A4 photo grid:
Step 1: Set Output Size to A4
Set the collage size to A4, as described above.
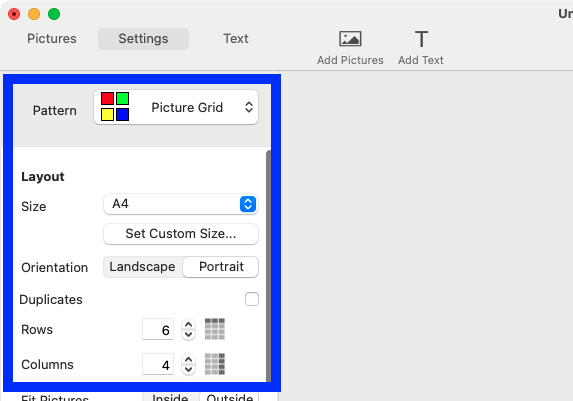
Step 2: Set up Layout
Next, set the Picture Grid pattern and specify the number of rows and columns. For this example, we will create a Portrait collage with six rows and four columns. But you can select any combination of rows and columns that suits your design, and as per the number of pictures you want to put on the A4 sheet.
Here's a detailed tutorial on creating a picture grid collage.
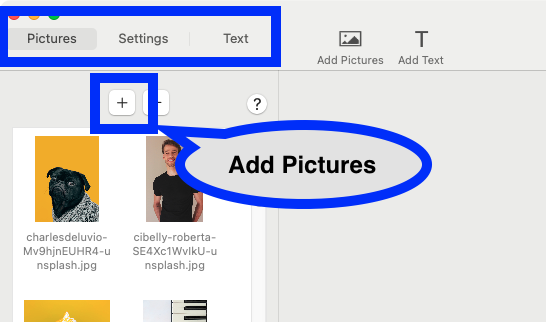
Step 3: Add Pictures
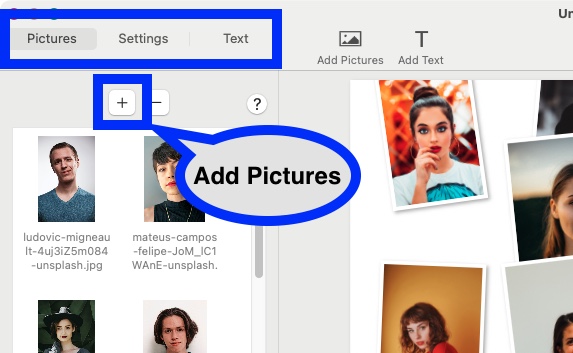
Navigate to the Pictures tab, then click the Add Pictures button to add photos to your collage. TurboCollage will automatically fill the grid with the images you have added.
Step 4: Customise Your Layout
You can personalise your collage in various ways to make it unique. You can move photos to different cells, crop images within their cells, add shadows to pictures, and choose a background colour. Additionally, you can include a text message in your collage.
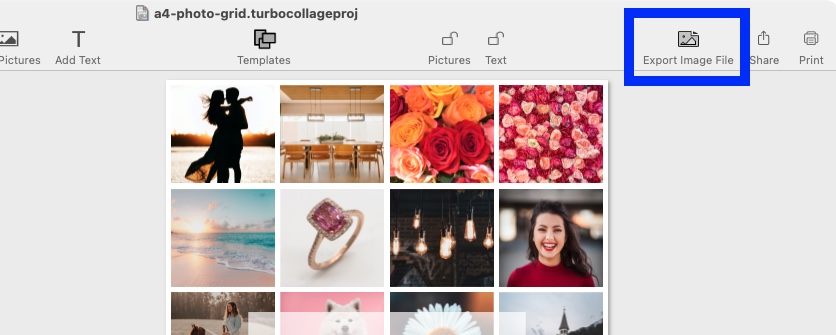
Step 5: Export the A4 Collage to JPG
Once satisfied with your collage, you can export it as a JPG, PNG, or TIFF image to share with friends or print it on an A4 sheet.
Create an Overlapping Collage on A4 Size Paper

An A4 paper size overlapping collage in landscape orientation. The size of this image has been reduced for fast downloading. Download original.
Step 1: Set Output Size to A4
Start by setting the collage dimensions to A4 as demonstrated in detail above.
Step 2: Select a Collage Pattern
Choose the "Regular Pile" collage pattern.
Step 3: Add Photos
Import your photos into the collage. TurboCollage will automatically arrange these images to overlap, producing a look of randomly placed printed photos.
Step 4: Customise Your Layout
You can adjust your collage by moving the photos around, resizing them (making them smaller or larger), or rotating them as needed. Additionally, you can adjust the layering of images by bringing specific pictures to the front or sending others to the back.
Here's a detailed tutorial on making overlapping photo collages.
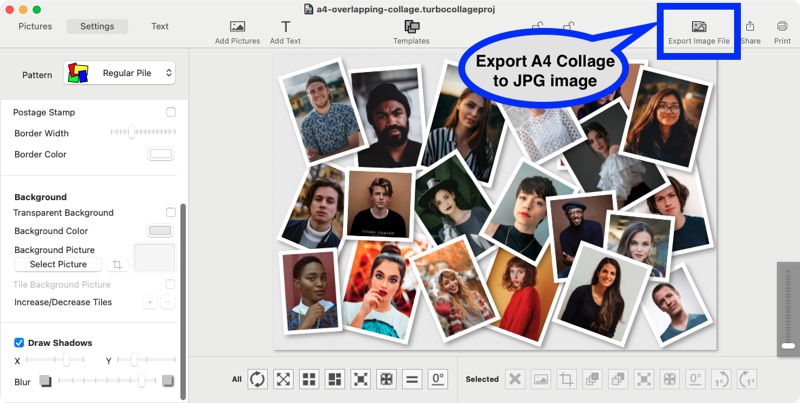
Step 5: Export Your A4 Collage
Once you are happy with the design and layout of your collage, export it as a JPG file. This format is ideal for both printing and sharing with others.
Make an A4 Collage with Hexagonal, Diamond, or Circular Photos

An A4 paper size collage featuring hexagonal photos. The size of this image has been reduced for fast downloading. Download original.
Step 1: Set Output Size to A4
Start by setting the collage dimensions to A4 as demonstrated in detail above.
Step 2: Select Photohive Collage Pattern
Choose the Photohive collage pattern and the Hexagon shape.

Step 3: Add Photos
Add photos to your collage. TurboCollage will automatically arrange the photos in a hexagonal grid.

Step 4: Customise the Collage
Re-arrange photos, add a background, modify border and spacing, and customise shadows. Learn more about making hexagon collages.

Note that you can change the Shape to make the various photo collages shown below.
Step 5: Change Photohive Shape
Select the other Hexagon shape to make a collage like the one shown below:

Select the Diamond shape to make the collage shown below. Here's a detailed tutorial on making diamond photo collages.

Select the Circle shape to make the collage shown below. Here's a detailed tutorial on making circle collages.

Make a Random A4 Photo Grid

An automatically generated random A4 photo grid. The size of this image has been reduced for fast downloading. Download original.
Step 1: Set Output Size to A4
Start by setting the collage dimensions to A4 as demonstrated in detail above.
Step 2: Select Picture Grid (Unequal) Collage Pattern
Choose the Picture Grid (Unequal) collage pattern.

Step 3: Add Photos
Add photos to your collage. TurboCollage automatically arranges the pictures into a photo grid.

Here's a detailed tutorial on making photo grids.
More Options to Make a Collage on an A4 Sheet
You can make many more exciting A4 collages than just overlapping collages or photo grids. Check out some of the sample collages to see the kind of collages you can make.
Here's another example:

An A4 paper size photo collage. The size of this image has been reduced for fast downloading. Download original.